Choosing the right Turn Style Gates is not just a matter of matching a product to an entrance. It means balancing visitor flow, security needs, accessibility, available space, and daily operating conditions. A gate that looks impressive in a showroom may create a queue beside your reception desk. Small details matter. How many people arrive at once? Will staff need to guide visitors, or should the system work with existing access-control equipment? These questions shape a practical shortlist.
Security technologist Bruce Schneier has said, “Security is a process, not a product.” That principle applies here: a gate supports a broader access plan, but it cannot replace thoughtful procedures or trained staff. Compare full-height, waist-high, and optical designs by their intended use, throughput, user experience, and maintenance demands. Ask suppliers about installation requirements, service response, and how the system handles power or network interruptions. Then check those answers against your actual site conditions, not assumptions. A narrow lobby, frequent deliveries, or a mix of staff and visitors can change what works. There is no perfect choice for every business. And specifications can look clearer on paper than they feel during a busy Monday morning. This guide outlines the trade-offs, questions, and selection criteria that help businesses choose Turn Style Gates with realistic expectations. It also leaves room to reassess: your first preference may not be your best fit.

Peak-hour demand is the arrival rate during your busiest sustained period, not the daily average. Count entries in five- or fifteen-minute intervals across several busy days. A lobby receiving 900 visitors in 30 minutes needs to process about 30 people per minute. Short bursts can be higher.
Compare that rate with the vendor’s throughput rating in persons per minute, then check how the figure was measured. Was it based on uninterrupted, single-person passage, or did it include credential checks and real walking speeds? A rated 40 people per minute may look comfortable on paper. It may not be comfortable when visitors pause, carry bags, or need assistance. Leave a practical margin rather than planning to run gates at their published limit.
Watch the approach lanes, too. A fast gate cannot clear a queue if visitors bunch up before reaching it. Separate entry and exit flows where possible, and account for groups arriving together. A simple site test during a busy period can reveal delays that a spreadsheet misses. The first estimate may be wrong; revise it after observing actual arrivals and passage times.
Tripod turnstiles suit controlled entrances where steady, moderate foot traffic matters more than speed. Their three arms create a clear physical barrier, and their compact footprint fits many lobby layouts. They are easy to understand at a glance. However, bags, mobility aids, and crowded arrival periods can make passage feel awkward, so check the usable lane width before choosing one.
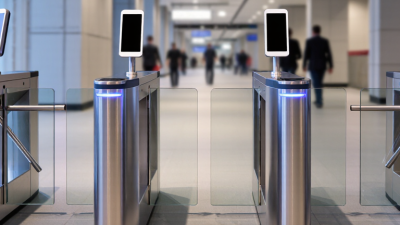
Speed gates use moving panels to support faster passage in busy offices or transit-style entrances. Optical turnstiles detect movement and can trigger an alarm when someone follows too closely, but they rely on careful sensor setup and attentive staff. A polished appearance is not enough. Test how the gates respond to people carrying backpacks, walking side by side, or pausing mid-lane. Small details can cause delays.
Full-height turnstiles provide a taller physical barrier and can help secure entrances with limited supervision. They need more floor space and may feel imposing in a customer-facing reception area. Compare all four designs against peak-hour flow, available space, accessibility needs, and the level of monitoring on site. Ask for a real-world demonstration, not just a specification sheet. Even then, the final choice may involve compromise. A faster lane can be less comfortable, while a stronger barrier can slow entry.
How to Choose the Best Turn Style Gates for Your Business
A turnstile can control entry neatly, but its rotating arms may block wheelchair users and people carrying bags. Under the 2010 ADA Standards for Accessible Design, turnstiles cannot form part of an accessible route. Provide a separate accessible gate or passage. Where the standard’s door and gate provisions apply, the clear opening must be at least 32 inches, measured with the door open 90 degrees, from its face to the stop. That is a minimum, not a comfort target. It is easy to miss this detail on a floor plan.
The World Health Organization’s 2022 Global Report on Health Equity for Persons with Disabilities estimates that 1.3 billion people, or 16% of the global population, experience significant disability. That figure makes accessible entry a practical planning concern, not a rare exception. Check the actual unobstructed opening, including hardware, rather than relying on a gate’s advertised width. Also review approach space, thresholds, and operating force; a nominally compliant opening can still feel cramped beside a wall or queue rail. Test the route with a mobility device before installation, if possible. One site detail may change the answer. Confirm current local requirements with a qualified accessibility professional, since building conditions and applicable codes vary.
Compare common gate styles by operation, suitable settings, and accessibility considerations. Actual dimensions, features, and performance vary by model and site layout, so confirm them in the product specifications and project plans.
| Gate Style | How It Works | Common Applications | Accessibility Check | Key Selection Consideration |
|---|---|---|---|---|
| Tripod turnstile | A rotating three-arm mechanism controls passage one person at a time. | Staff entrances, gyms, and sites where a compact controlled entry is needed. | Do not make a turnstile the only route for people who cannot use it. Provide an accessible gate or alternate accessible passage. | Compact footprint, but the arms and controlled passage may not suit people using mobility devices or carrying bulky items. |
| Optical swing gate | Sensors detect passage; one or more powered leaves open and close across the lane. | Office lobbies, transit facilities, and reception areas that need a more open visual design. | Check the clear opening with the leaves in the required position. Confirm the accessible passage is clearly identifiable and usable. | Compare lane width, sensor behavior, opening speed, and how the gate responds to alarms or power loss. |
| Speed gate | Short barriers or glass leaves open to permit authorized passage and close afterward. | Commercial buildings and other staffed or electronically controlled entrances. | Specify an accessible lane or gate where needed; verify its unobstructed clear width and controls against applicable requirements. | Review the complete lane layout, including approach space, barriers, and the path to the accessible passage. |
| Full-height rotor | A tall rotating assembly creates a controlled passage through a full-height barrier. | Perimeter entrances where a substantial physical barrier is part of the security plan. | A full-height rotor is not a substitute for an accessible passage. Provide a separate accessible gate or route. | Consider its larger installation footprint, entry and exit arrangements, and whether the site needs a separate accessible gate. |
| Accessible swing gate | A hinged or powered leaf opens to provide a wider passage than a standard controlled lane. | Accessible routes beside turnstiles or controlled lanes in public and workplace settings. | Measure the clear opening, not just the nominal gate or frame width. Check maneuvering space, hardware, and operation for the specific installation. | Coordinate the opening, controls, security system, and approach area with the entrance design. |
| Accessible sliding gate | A powered or manually operated leaf slides aside to open the passage. | Entrances where a swing leaf would conflict with available floor space. | Confirm clear opening, operating controls, threshold conditions, and safe operation for the installed configuration. | Check side clearance for the sliding leaf and confirm how the gate operates during a power or system interruption. |
Accessibility note: The U.S. ADA Standards for Accessible Design specify a minimum 32-inch clear width for door openings under Section 404.2.3. This is a clear-opening measurement, not a nominal product width. Confirm which requirements apply to the specific gate and accessible route; consult the applicable standards and a qualified design professional. See the 2010 ADA Standards for Accessible Design.
When comparing turn style gates, check how each reader communicates with its access controller. OSDP Secure Channel uses AES-128 encryption to protect data traveling between these devices. That matters when a reader sits several feet from the controller, connected by a cable that may pass through a busy service area. Encryption makes intercepted communication harder to read or alter. It does not secure every part of the system. Weak key handling, outdated firmware, or poor installation can still leave gaps.
Tips: Ask whether Secure Channel is enabled, not merely supported. Confirm who manages encryption keys and how updates are applied. Test the reader-controller connection during commissioning. Keep the answers in your project notes.
A gate can control passage well, yet still rely on a vulnerable credential setup. Review the full path: credential presentation, reader, cable, controller, and access software. Ask the installer to explain what happens if communication is interrupted. A clear answer is useful. A vague one deserves a follow-up. I have seen technical checklists become too focused on the gate hardware itself; that is easy to do, and worth reconsidering before purchase.
A turnstile can manage daily traffic, but it must not obstruct escape during an emergency. Ask what happens when power fails, a fire alarm activates, or a person needs to leave against the normal flow. Test each condition on the actual gate, not only in a sales demonstration. Watch the arms or barriers move, and confirm the route remains clear. Small details matter.
Fire-alarm integration should be documented and tested with the building’s alarm system. Confirm who supplies the interface, how signals are supervised, and whether the gate releases or opens as the approved design requires. “It connects to the alarm” is not enough. Record test results and assign responsibility for retesting after wiring or software changes.
Local requirements can vary by occupancy, doorway layout, accessible route, and adopted fire and building codes. Share plans with the authority having jurisdiction and qualified fire-protection and accessibility professionals before purchase. Check clear widths, manual release arrangements, signage, and nearby doors under real operating conditions. A checklist helps, but it can miss awkward crowd behavior; observe peak-time queues, too. Keep the compliance documents, alarm test records, and maintenance schedule together for inspection.